Crochet Makeup Bag Free Pattern: Make a Stylish Handmade Pouch
The tutorial video is at the bottom of the article.👇
Have you ever reached into your handbag looking for lipstick or mascara, only to find your beauty essentials scattered between your keys, wallet, and other belongings? A handmade crochet makeup bag can help you keep everything in one place while adding a personal touch to your everyday accessories.
Making your own makeup pouch is also a lovely way to enjoy crochet beyond blankets and scarves. You can choose colors that match your style, experiment with different stitches, and create a useful accessory for yourself or someone special. Whether you want a compact pouch for daily essentials or a larger bag for travel, a little planning will help you create something both attractive and practical.
In this guide, you’ll learn about the materials, techniques, construction process, and customization options to consider when making your own crochet makeup bag.
Why You’ll Love This Crochet Makeup Bag Free Pattern
A handmade cosmetic pouch is a small project with plenty of practical benefits. It can help you organize your beauty products without requiring a large amount of space in your handbag or suitcase.
Here are a few reasons to try this project:
- Keep essentials organized: Store lipstick, mascara, compact powder, and other small products together.
- Choose your own style: Use favorite colors, textured stitches, or contrasting borders.
- Create a useful gift: A crochet makeup bag makes a thoughtful present for birthdays, holidays, or care packages.
- Practice your crochet skills: A simple pouch can help you become more comfortable with working in rows, joining pieces, and finishing edges.
- Make it your own: Adjust the dimensions and closure to suit your everyday needs.
If you’re new to crochet, look for a pattern with clear instructions and a straightforward construction method. Adding a zipper or fabric lining may require a little extra patience, but these details can give your finished pouch a polished look.
Crochet Makeup Bag Pattern: Project Details
Before you begin, consider how you plan to use your makeup bag.
| Project detail | Description |
|---|---|
| Project type | Crochet cosmetic pouch |
| Skill level | Depends on the chosen pattern |
| Construction | Crocheted panel or pouch-shaped body |
| Techniques | Basic stitches, joining, and finishing |
| Closure options | Zipper, button, or drawstring |
| Customization | Colors, texture, size, and lining |
| Finished dimensions | Follow the measurements of your selected pattern |
Think about what you’ll store inside the pouch. A small bag may be perfect for lipstick and lip balm, while a larger design can accommodate brushes, skincare products, and travel-size cosmetics.
Materials and Supplies for Your Crochet Makeup Bag
You don’t need many supplies to make a crochet cosmetic pouch. Gather the materials below before starting, then check your chosen pattern for the exact quantities and specifications.
| Material | Purpose |
|---|---|
| Yarn | Creates the body of the makeup bag |
| Crochet hook | Works the stitches specified in the pattern |
| Scissors | Trims yarn ends |
| Yarn needle | Weaves in loose ends and helps with finishing |
| Measuring tape | Checks the finished dimensions |
| Zipper, button, or drawstring | Keeps the pouch closed |
| Sewing needle and thread | Attaches a zipper or lining, if needed |
| Fabric lining | Provides an optional additional interior layer |
Choosing the Best Yarn
Your yarn choice affects how the finished makeup bag looks, feels, and holds its shape.
Cotton yarn is a popular option because it generally provides good stitch definition and creates a relatively firm fabric. Acrylic yarn offers a wide range of colors and can work well for casual everyday accessories.
When selecting yarn, consider these points:
- Choose a yarn that suits the texture and structure required by your pattern.
- Check the care instructions, especially if you expect the pouch to need frequent cleaning.
- Avoid overly loose stitches if you plan to carry small makeup items.
- Consider a washable yarn for an accessory that may encounter cosmetic residue.
Selecting the Right Crochet Hook and Closure
Use the crochet hook size recommended by your pattern. If you’re designing your own pouch, remember that hook size and tension affect the fabric’s density and final dimensions.
For the closure, choose an option that suits your experience and intended use. A drawstring can be straightforward, while a zipper provides a more enclosed finish. A button and loop may offer a decorative alternative.
Crochet Stitches and Techniques You’ll Need
Many crochet makeup bags use familiar stitches, although the exact techniques depend on the pattern you choose.
- Chain stitch (ch): Often used to begin the project.
- Single crochet (sc): Creates a compact fabric suitable for many small accessories.
- Slip stitch (sl st): May be used for joining or finishing.
- Turning chain: Helps position the next row when working flat.
Consistent tension is especially useful when making a pouch. If one section is noticeably wider than another, the sides may not line up neatly during assembly.
If your pattern includes gauge instructions, make a small swatch first. Measuring your work as you go can also help you catch size differences before they become difficult to correct.
How to Crochet a Makeup Bag Step by Step
The construction method will depend on your selected design. Some bags begin as a flat rectangular panel that is folded and joined, while others are crocheted in a continuous shape. Use the following steps as a general overview and follow your pattern for the exact stitch counts and measurements.
Step 1: Crochet the Main Panel
Begin with the starting chain and stitch pattern specified in your instructions. Work the required rows, keeping your tension as consistent as possible.
Measure the panel before moving on. It should match the intended dimensions so your makeup bag has enough room for the products you want to carry.
Step 2: Shape the Pouch
Depending on the design, you may fold the panel to form the front, back, and base of the bag. Other patterns may create these sections separately.
Align the edges carefully before joining them. If your design includes a flat base or shaped corners, follow the pattern’s instructions to create the intended form.
Step 3: Join the Sides
Use the specified joining method to secure the edges. Work slowly and check that the seams remain even.
Neat seams help the pouch hold its shape and prevent gaps that could allow small items to slip through. Weave in loose ends securely as you finish each section.
Step 4: Attach the Closure
A closure makes your handmade makeup bag more convenient to carry.
- Zipper: Useful when you want the pouch to close securely.
- Button and loop: A decorative choice for a simple design.
- Drawstring: Suitable for a pouch that gathers at the top.
If you’re adding a zipper, align it with the opening before attaching it. Pinning or temporarily basting the zipper in place can help prevent puckering.
Step 5: Add a Lining and Finish the Bag
A fabric lining is optional, but it can be useful if your crochet stitches leave visible gaps or you want a smoother interior.
Measure the finished pouch before cutting the fabric. Attach the lining neatly, making sure it doesn’t interfere with the closure.
Finally, weave in any remaining ends and test the bag with a few of your everyday beauty essentials.
Tips for Making a Neat and Durable Crochet Makeup Bag
Small details can make a big difference in the finished accessory.
- Keep your stitch tension consistent.
- Check the dimensions before joining the pieces.
- Secure the seams and closure carefully.
- Consider a denser stitch pattern if small items might catch in the fabric.
- Avoid overfilling the pouch, as this can stretch the crochet fabric.
- Follow the yarn’s care instructions to help maintain its appearance.
| Common problem | Possible solution |
|---|---|
| The pouch loses its shape | Review your yarn choice and fabric density |
| The sides look uneven | Align and measure the edges before joining |
| The zipper puckers | Position it carefully before sewing |
| Small items catch in the stitches | Consider denser stitches or a lining |
| The closure feels loose | Reinforce the attachment points |
Creative Ways to Customize Your Crochet Makeup Bag
One of the most enjoyable parts of making your own accessory is choosing the details.
Experiment with Colors and Textures
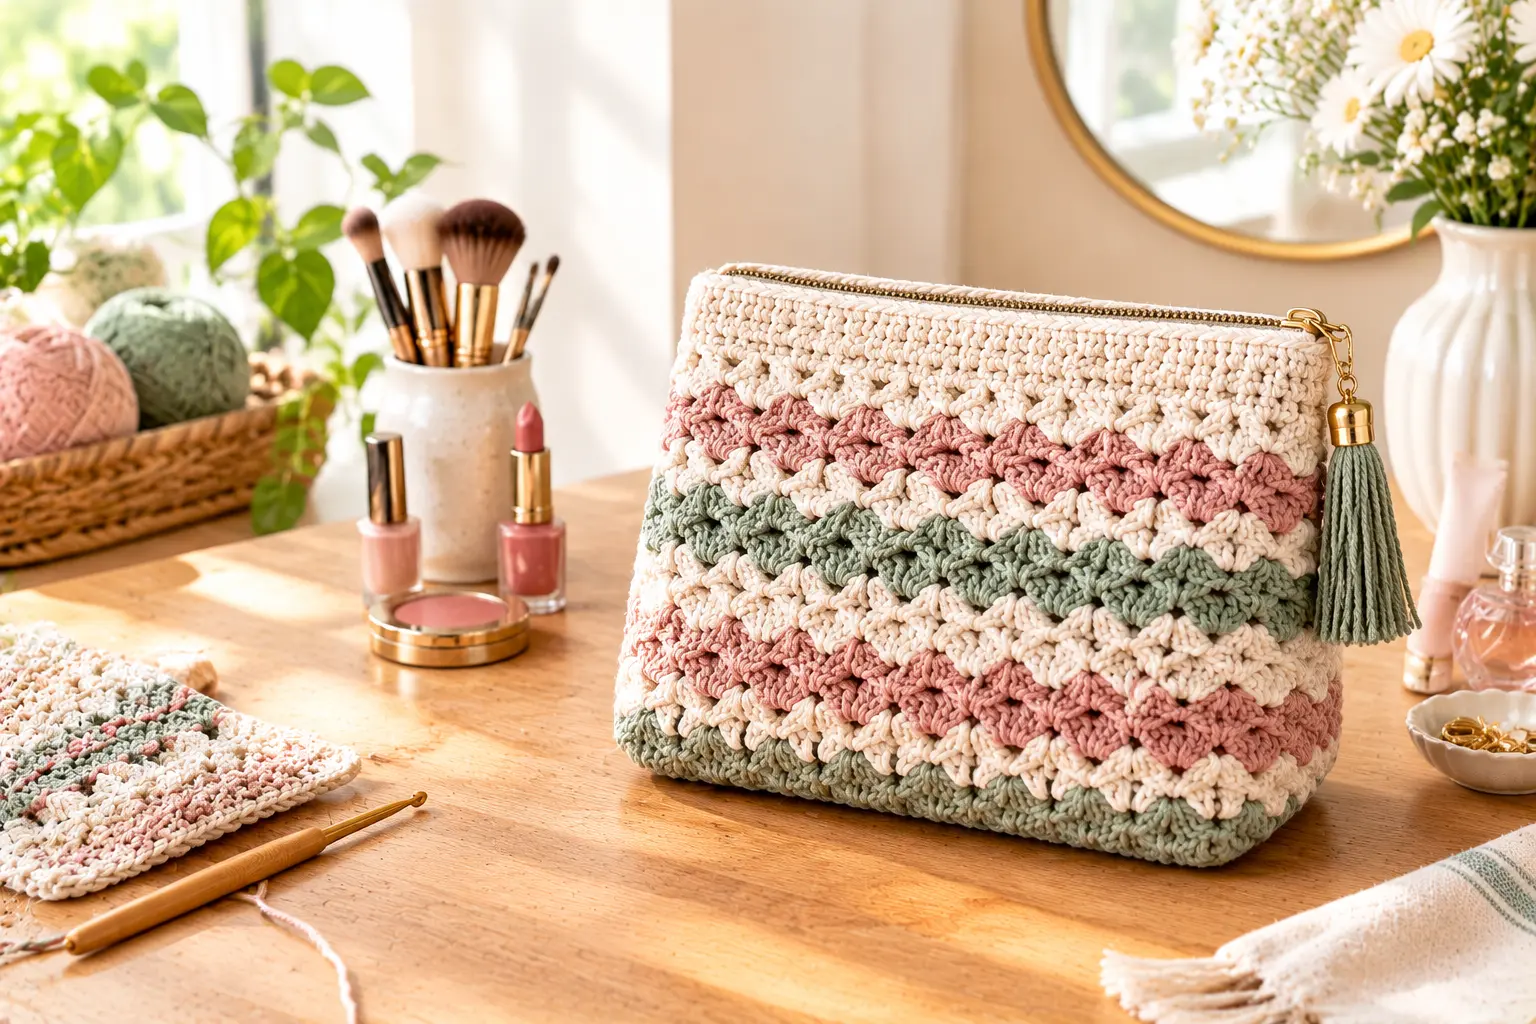
Use cream, beige, or soft pink for a gentle, understated look. If you prefer something bolder, try contrasting colors, stripes, or color-blocked sections.
Textured stitches can add visual interest without requiring extra decorations. Choose a stitch pattern that complements the yarn and suits your skill level.
Choose a Size That Fits Your Routine
A compact crochet cosmetic pouch works well for a few daily essentials. If you regularly carry makeup brushes, skincare products, or travel toiletries, consider a larger design.
Measure the items you want to store before changing the pattern dimensions. Remember that size adjustments may affect yarn requirements and closure placement.
Add Personal Details
A lining, decorative border, or small handmade label can make your pouch feel special. If you’re making it as a gift, choose colors that suit the recipient and include a few useful beauty accessories.
How to Care for Your Handmade Makeup Bag
Cosmetics can leave marks on fabric, so it’s helpful to care for your pouch regularly.
- Follow the washing instructions for your yarn and lining.
- Clean small cosmetic spills promptly using a method suitable for the materials.
- Check whether the zipper, button, or other closure can tolerate washing.
- Let the pouch dry completely before placing cosmetics inside.
- Store it in a dry place and avoid leaving it overfilled.
Frequently Asked Questions About Crochet Makeup Bags
Is a crochet makeup bag free pattern suitable for beginners?
Many simple designs are beginner-friendly, especially those using basic stitches and straightforward assembly. Check that the pattern provides clear instructions and the necessary measurements.
What is the best yarn for a crochet makeup bag?
Cotton yarn is a useful choice for a relatively firm fabric with clear stitch definition. Acrylic yarn may also work well. Consider durability, washability, and the structure required by your chosen design.
Can I add a zipper to my crochet makeup bag?
Yes, if the design supports a zipper. Align the zipper carefully with the opening and sew it securely. A fabric lining may also be helpful, depending on the construction.
Should I line my crochet makeup bag?
A lining is optional, but it can provide a smoother interior and help prevent small items from catching in open stitches. It may also make cleaning cosmetic residue easier, depending on the fabric.
How do I choose the right makeup bag size?
Measure the products you want to carry and compare them with the pattern’s finished dimensions. Leave enough room to remove items comfortably without stretching the bag.
Can I make a crochet makeup bag as a gift?
Absolutely! A handmade cosmetic pouch is practical and easy to personalize with colors, textures, and decorative details. You can even pair it with a matching crochet accessory.
Conclusion: Create a Crochet Makeup Bag That Reflects Your Style
A crochet makeup bag is a practical little project that brings creativity and organization together. With the right yarn, a suitable stitch pattern, and a closure that fits your needs, you can make a pouch that’s useful at home and convenient to carry when you’re out and about.
Take time to plan the dimensions, check your tension, and finish the seams neatly. Then personalize your project with colors and details that make it yours.
Ready to start your next crochet project? Visit www.crochetwhisper.com for more crochet inspiration, free pattern ideas, and handmade accessories. If you make a crochet makeup bag, share your favorite colors and customization ideas in the comments!