Crochet Octopus: No-Sew Crochet Octopus Pattern – Squishy the Octopus
The tutorial video is at the bottom of the article.👇
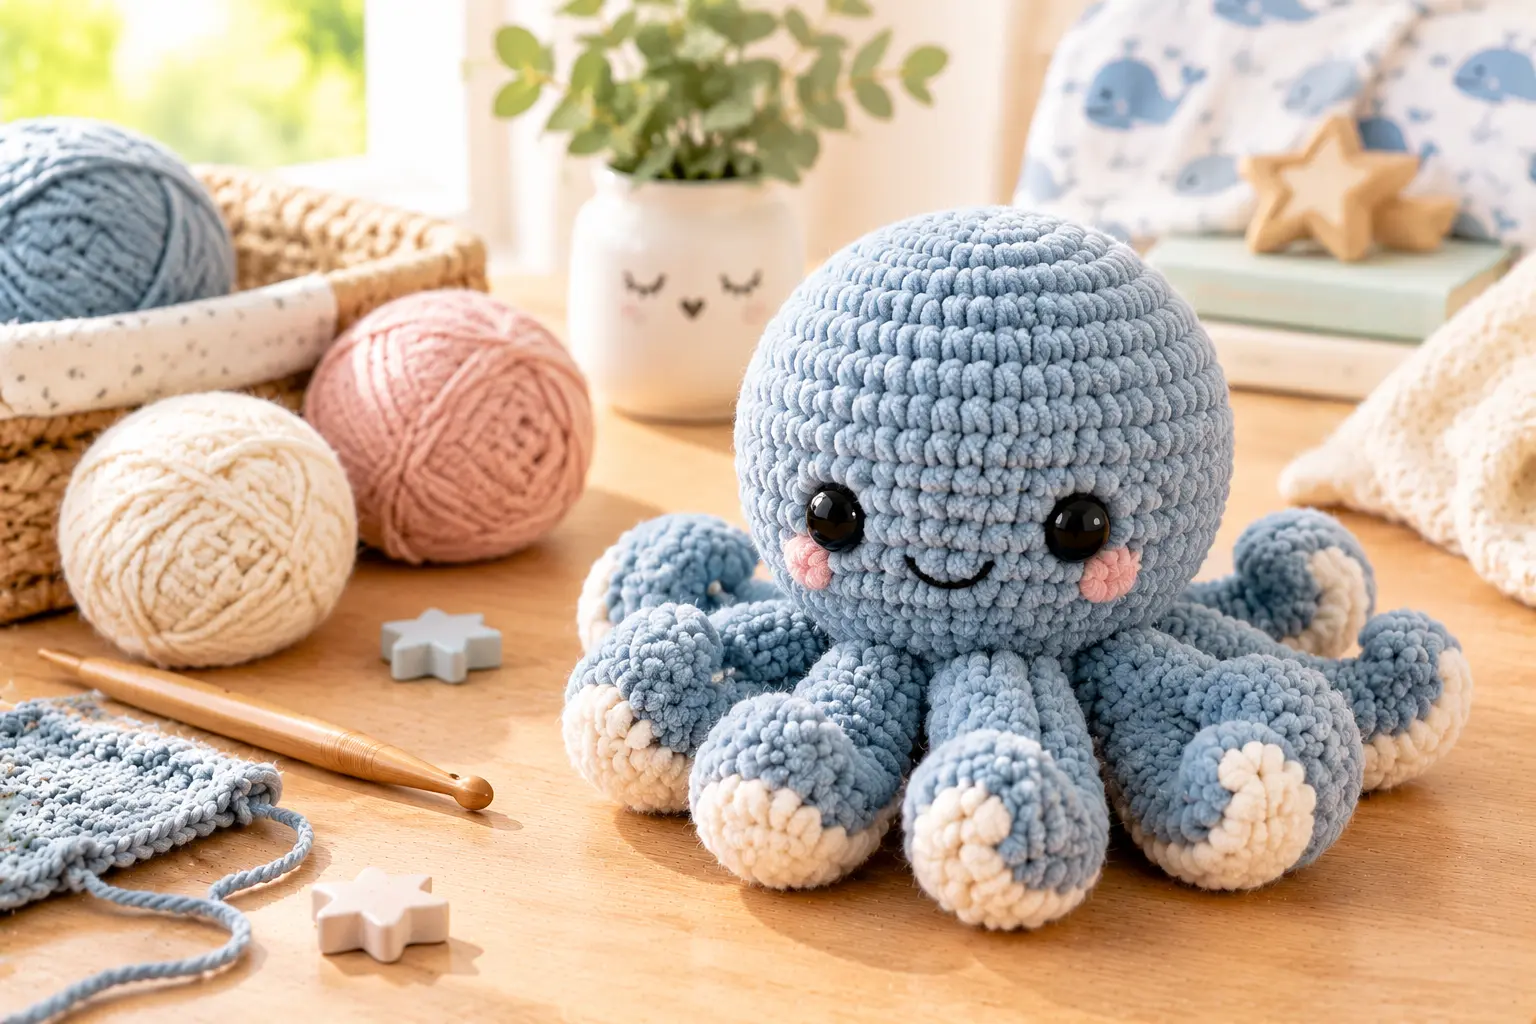
If you love making cute crochet toys but would rather skip complicated assembly, Squishy the Octopus might be your next favorite project. With its rounded body, playful tentacles, and sweet little face, this handmade sea creature is a lovely way to turn a ball of yarn into something full of personality.
A no-sew crochet octopus pattern is especially appealing when you want to spend more time crocheting and less time attaching separate pieces. Whether you are building your amigurumi skills or looking for a thoughtful handmade gift, Squishy the Octopus offers plenty of opportunities to practice basic techniques and experiment with color.
In this guide, you will discover the materials you need, the crochet stitches to know, an overview of the construction process, and practical tips for creating a neat, charming Crochet Octopus of your own.
Why You’ll Love This No-Sew Crochet Octopus Pattern
Squishy the Octopus combines a playful design with the satisfaction of making something by hand. Its distinctive shape makes it recognizable, while the opportunity to customize its colors gives every finished toy a different personality.
Beginner-Friendly and Fun to Make
If you already know how to work single crochet stitches, increases, and decreases, you have a useful foundation for many amigurumi projects. You can practice these skills while shaping a rounded body and creating the octopus’s tentacles.
If you are new to crochet, take your time with the first few rounds. Using a stitch marker and counting your stitches regularly can help you feel more confident as your project takes shape.
Less Sewing, More Crocheting
The main attraction of a no-sew design is that some features can be worked directly into the main piece instead of being crocheted separately and attached afterward. Depending on the construction, this can reduce finishing time and help create a more integrated look.
Always check the actual Squishy pattern to see which parts are worked together and whether any finishing or assembly is still required.
A Thoughtful Handmade Gift
A little crochet octopus makes a charming addition to an ocean-themed collection, a handmade gift basket, or a shelf filled with crocheted animals. You can also create several octopuses in different colors to make a cheerful collection.
Crochet Octopus Pattern at a Glance
| Project detail | Description |
|---|---|
| Project name | Squishy the Octopus |
| Project type | Crochet amigurumi sea animal |
| Skill level | Confirm with the complete pattern |
| Construction | No-sew or minimal-sew, depending on the verified design |
| Main techniques | Single crochet, increases, decreases, working in rounds |
| Yarn | Use the yarn specified in the pattern |
| Hook size | Follow the tested pattern instructions |
| Finished size | Check the pattern’s measurements |
| Pattern format | Written instructions and/or video, if available |
Before beginning, check the complete pattern for its exact yarn quantity, hook size, stitch counts, and finished dimensions. These details help you choose the right supplies and achieve a result similar to the original design.
Ingredients and Materials for Squishy the Octopus
Gathering your materials before you begin makes the crocheting process easier and more enjoyable.
Materials Checklist
| Material | What you need it for |
|---|---|
| Yarn | Creates the octopus body and tentacles |
| Crochet hook | Forms the stitches and shapes the toy |
| Toy stuffing | Gives the body its rounded shape |
| Safety eyes or embroidery thread | Creates the facial features |
| Stitch marker | Marks the beginning of each round |
| Scissors | Cuts yarn when needed |
| Yarn needle | Weaves in ends or completes any required finishing |
Use the yarn weight, hook size, and amount recommended by your chosen pattern. The exact requirements can vary with yarn thickness, stitch tension, and the finished size you want.
Choosing Yarn for Your Crochet Octopus
Soft, durable yarn is a practical choice for amigurumi. Cotton, acrylic, and suitable blends can all work well, depending on the pattern and the intended use of the finished toy.
Consider these tips when choosing your yarn:
- Select a color that suits the personality you imagine for Squishy.
- Choose yarn that allows you to see your stitches clearly.
- Follow the recommended hook size to help create a dense fabric.
- If you substitute yarn, remember that the finished octopus may turn out larger, smaller, or differently textured.
Choosing Eyes and Stuffing
Safety eyes can create a polished appearance, while embroidered eyes offer another way to give your octopus a sweet expression. If the toy is intended for a young child, consider embroidered features and make sure every detail is securely finished.
Use appropriate toy stuffing and follow the care instructions for your materials. Do not assume that a toy is suitable for every age simply because it is handmade.
Crochet Stitches and Techniques You’ll Need
You do not need an extensive collection of advanced stitches to make many amigurumi designs. A few foundational techniques can help you shape the body and tentacles.
Basic Crochet Stitches
- Magic ring: Creates a closed center for starting a rounded piece.
- Single crochet (sc): Produces the compact fabric commonly used for amigurumi.
- Increase (inc): Adds stitches to expand the shape.
- Decrease (dec): Reduces stitches to shape or close the body.
- Slip stitch (sl st): Helps with joining or finishing when required.
Check the pattern’s abbreviation list before you begin, since individual designers may use slightly different notation.
Working in Continuous Rounds
Many amigurumi projects are crocheted in continuous rounds rather than joined at the end of every round. A stitch marker helps you identify where each round begins.
Count your stitches as you work. If the pattern calls for a particular number at the end of a round, check that number before moving on. Correcting a missed increase early is usually easier than trying to fix the shape later.
How to Make Squishy the Octopus: Step-by-Step Overview
The following overview explains the general construction process. For accurate stitch counts, round-by-round instructions, and the specific no-sew method, follow the complete Squishy the Octopus pattern.
Step 1: Start the Octopus Body
Begin with the foundation specified in your pattern. Some amigurumi designs start with a magic ring, followed by single crochet stitches and carefully placed increases.
Keep the starting point marked and check your stitch count as the body begins to expand.
Step 2: Shape the Head
Continue working according to the pattern to form the rounded head. Consistent tension helps create an even surface, while the correct increase and decrease placement gives the body its intended shape.
If you notice unexpected gaps, review your tension and hook size before continuing.
Step 3: Create the Tentacles
The tentacles give Squishy its distinctive octopus appearance. Follow the pattern’s specific instructions for making them, including any chains, stitch combinations, or shaping techniques.
If the design incorporates the tentacles directly into the body, pay close attention to the construction sequence. Keeping the tentacles consistent helps the finished octopus look balanced.
Step 4: Add Stuffing and Finish the Body
Add stuffing at the stage specified in the instructions. Distribute it evenly to maintain a rounded shape without making the body excessively firm.
Complete the closing and finishing steps as directed by the pattern. If the design requires any sewing, secure those parts carefully.
Step 5: Give Squishy a Face
Facial features help bring your crochet octopus to life. Follow the recommended placement for the eyes and mouth, checking the expression before securing embroidered details.
Finally, weave in any loose ends and inspect the finished toy for gaps, loose pieces, or unfinished stitches.
Helpful Tips for a Neat Crochet Octopus
A few small habits can make a noticeable difference to your finished project.
Keep Your Stitches Consistent
Use the recommended hook and yarn combination, and aim for even tension. Amigurumi fabric generally needs to be dense enough to help prevent stuffing from showing through.
Count Your Stitches
A stitch marker is particularly helpful when working in continuous rounds. Check your stitch count regularly so your body shape follows the pattern.
Check the Tentacles as You Work
Follow the same instructions for each tentacle and compare their lengths as you go. If they look uneven, check your chain lengths, stitch placement, and tension.
Solve Common Problems
| Problem | Possible solution |
|---|---|
| Stuffing shows through | Check tension and hook size |
| Body looks uneven | Recount stitches and review increases |
| Tentacles vary in length | Follow the same stitch sequence consistently |
| Shape looks too firm | Review how much stuffing you are adding |
| Face looks off-center | Check placement before securing the features |
Customize Your Crochet Octopus
One of the best parts of making Squishy is choosing its appearance.
Experiment With Colors
Pastel pink, lavender, mint green, and baby blue can create a gentle, whimsical look. Bright orange, turquoise, or purple can give your octopus a bolder personality. You can also use contrasting colors for the body and tentacles if your pattern allows.
Create a Unique Expression
Try an embroidered smile or another simple facial expression that suits your design. Small changes in eye placement can make your octopus look curious, sleepy, or cheerful.
Make a Whole Octopus Collection
Once you have completed one octopus, you might want to try different yarn colors or sizes. Remember that changing yarn weight or hook size can affect the final dimensions, so use the appropriate instructions for your chosen materials.
How to Care for Your Handmade Crochet Octopus
To keep your finished toy looking its best, follow the washing and drying instructions for the yarn and stuffing you used.
- Check the yarn label before washing.
- Use a gentle cleaning method appropriate for the materials.
- Allow the octopus to dry completely before storing it.
- Inspect facial features and other details regularly.
- If you make the toy for a child, ensure it is appropriate for the child’s age and intended use.
Frequently Asked Questions About Crochet Octopus Patterns
Is This Crochet Octopus Pattern Suitable for Beginners?
It may be suitable if you are comfortable with basic stitches, increases, decreases, and working in rounds. Check the complete Squishy pattern to confirm its skill level and any special techniques.
What Makes a No-Sew Crochet Octopus Different?
A no-sew crochet octopus is designed to reduce or eliminate the need to attach separately made pieces. Some designs still require finishing, so check the instructions before starting.
What Yarn Is Best for a Crochet Octopus?
Choose the yarn recommended by the pattern. Soft cotton, acrylic, or suitable blends may work well, but yarn weight and hook size affect the final texture and dimensions.
Can I Make Squishy the Octopus in Different Sizes?
Yes, you can experiment with different yarn weights and hook sizes, but the finished measurements will change. For the most predictable result, follow the original materials recommendations.
Can I Use Embroidered Eyes Instead of Safety Eyes?
Embroidered eyes are an alternative to plastic safety eyes. Make sure the embroidery is secure and that the finished toy is appropriate for its intended recipient.
How Much Yarn Do I Need for a Crochet Octopus?
The amount depends on the pattern, yarn weight, and finished size. Check the materials list for the actual quantity instead of relying on an estimate.
Is the Squishy the Octopus Pattern Free?
Check the pattern page for the current access details. If you publish this project as a free pattern, clearly identify where readers can access the complete instructions.
How Do I Keep My Crochet Octopus From Looking Uneven?
Maintain consistent tension, mark the beginning of each round, and count your stitches. Check the body shape and tentacles as you work so you can correct small problems early.
Conclusion: Make Your Own Squishy the Octopus
Creating a Crochet Octopus is a fun way to practice amigurumi techniques and turn simple yarn into a handmade character full of charm. With its rounded body, playful tentacles, and customizable colors, Squishy the Octopus can become a lovely addition to your handmade collection.
Gather your materials, follow the complete pattern, and take your time with the shaping and finishing. Whether you choose a soft pastel palette or a bright ocean-inspired color combination, your finished octopus can reflect your own creative style.
Ready to make Squishy the Octopus? Visit www.crochetwhisper.com for more crochet inspiration, beginner-friendly projects, and handmade pattern ideas. Share your favorite color combination in the comments, and let other crocheters see how you bring your little sea creature to life!